Update: The Linux end of this tutorial does not work in Ubuntu 9.10, Karmic Koala. Please see this post, and this one, for more details and workarounds
I have to work on a Windows machine at work every day. It’s okay, I suppose, but it’s Windows with all that implies. I’m more of a Linux person – I find that I am far more productive in a Linux environment simply due to a user interface that works the way I want to. Because of this I also spend much of my working day using Linux – even going so far as to sometimes shuffle files over the network to the Linux box so that I can work on them in that environment rather than in Windows. Whilst I may occasionally shuffle files around, though, I don’t really want to spend all day shuffling myself back and forth between two machines. So I just connect to the Linux box remotely, and work with all my normal Linux tools from my Windows machine.
There are several ways to remotely connect to a Linux box and I don’t profess that this approach is any better or worse than any other – it’s just the one that I happen to use, and that works well for me. Please note, however, that the method I use (XDMCP) uses an insecure protocol – whilst it’s fine to use it within an internal network with a good firewall between you and the internet at large, it’s not at all safe to use when your machines are directly connected to the internet, or where your network may not be secure (e.g. a typical wifi connection, or you just don’t trust your co-workers). Don’t say I didn’t warn you.
Step 1: Get yourself a Linux box
It goes without saying that you’ll need a Linux machine to connect to – but I’ll say it anyway. It doesn’t have to be a real Linux box – a virtual machine running in VMWare Player or Virtual Box will do (other virtualisation products are available). In any case you need to ensure that you’ve got a network connection between the Windows machine and the Linux box (the venerable “ping” command should suffice).
If you are setting up a Linux box from scratch – whether real or virtualised – then I recommend Ubuntu, at least in part because that’s what the rest of this post is based on.
Step 2: Enable Remote Login
• On the Ubuntu box log in with an administrator account and go to System=>Administration=>Login Window
• Go to the “Remote” tab and from the “Style” popup select something other than “Remote Login Disabled”. I use “Plain” to cut down on the amount of data going over the network and because it works better with the rootless option I’ll be using later. I also turn off the Logo option, again to keep things simple and plain
• Close the dialogue
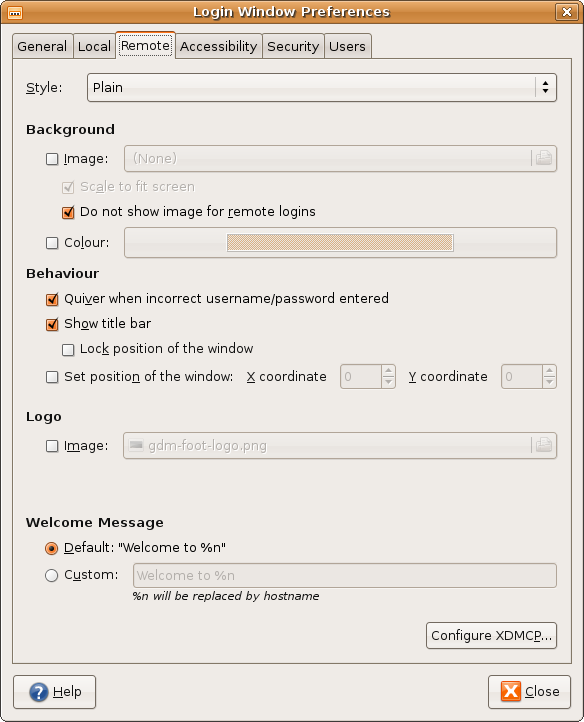
(click on the image for a larger version)
• While you’re logged into the Linux box you need to find out its IP address. There are several ways to do this, but in Ubuntu you can get this from the System=>Administration=>Network Tools application. You’ll need to select your Network Device from the popup menu near the top of the “Devices” tab – for a physical machine it’s probably eth0 or eth1, but for a virtual machine you might need a bit of trial and error. Once you’ve got an IP you should be able to ping it from the Windows machine to confirm that it’s the right value

Finally you’ll need to restart GDM for the changes in the “Login Window” dialogue to take effect. Rebooting the Linux box will do the trick.
Step 3
• Download a copy of Xming onto the Windows machine and install it
• Dig down in your Windows Start menu until you find the “Xming” option. Don’t launch it – you want to right click and select “Create Shortcut”. This will add an extra item to the menu, probably called “Xming (2)”
• Right-click on the new menu item and select “Properties”
• In the properties dialogue select the “General” tab and give the shortcut a more descriptive name. Then go to the “Shortcut” tab and edit the “Target” field to look something like this (all on one line, including the quotes – I’d copy and paste it if I were you):
"C:\Program Files\Xming\Xming.exe" :0 -clipboard -lesspointer -notrayicon -rootless -once -query 192.168.213.131
– The path should point to the real location of Xming.exe.
– Edit the IP after “-query” to be the IP of the Linux box you’re connecting to
• Apply the changes and close the Properties dialogue
Step 4: Your first remote connection
You should now be able to select the shortcut to launch Xming and connect to your Linux box. With luck you’ll be presented with a login screen, and should be able to log in.

If you don’t get a login screen then there’s clearly a problem. In my experience it’s likely to be one of two things:
1) The changes to enable remote login on the Linux box haven’t been applied properly. Check the settings in the dialogue, then reboot the machine to make sure that GDM gets restarted.
2) A firewall is blocking the connection. Temporarily disable any firewalls to see if that fixes the issue. If it does then you’ll need to open ports in your firewall to let the XDMCP connection through – but that’s outside the scope of this article (hint: at the least you’ll probably need to let UDP port 177 and TCP port 6000 through, search for “XDMCP firewall” or something similar for more details)
If you are having problems, make sure you quit any existing copy of Xming that may be running before trying again (right click on the taskbar entry and select “Close”). If you’re still having problems, bring up the task manager to ensure that there are no rogue XMing processes running which aren’t present on the task bar.
Step 5: Going rootless
If you’ve got this far then well done. You should now be able to log into your Linux box and use it as if you were sitting in front of it – with the exception of any fancy 3D or composited stuff (wobbly windows, spinning cubes, 3D games and so on) which unfortunately don’t work over a remote connection like this.
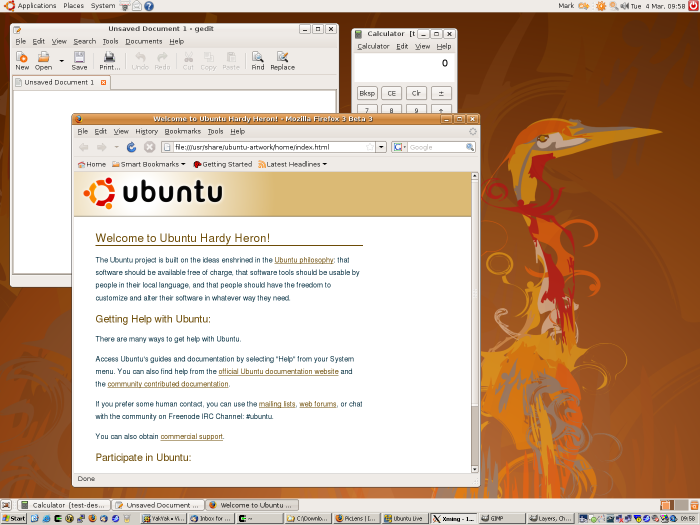
As you can see in the image above we’ve now got a full Linux desktop running, with the Windows taskbar at the bottom. Just above the Windows taskbar is the Ubuntu taskbar, showing the three Linux windows that are open. Conversely the Windows taskbar has just a single entry for Xming – all of the Linux windows live within a single “layer”. If you minimize Xming then all of the Linux windows go with it. Conversely if you bring Xming to the top of the window stack, all of the Linux windows come to the top as well.
For many people who just need a way to remotely access a Linux box, this will be good enough. But there are a some extra steps that you can take to make it a bit easier to switch between Linux and Windows.
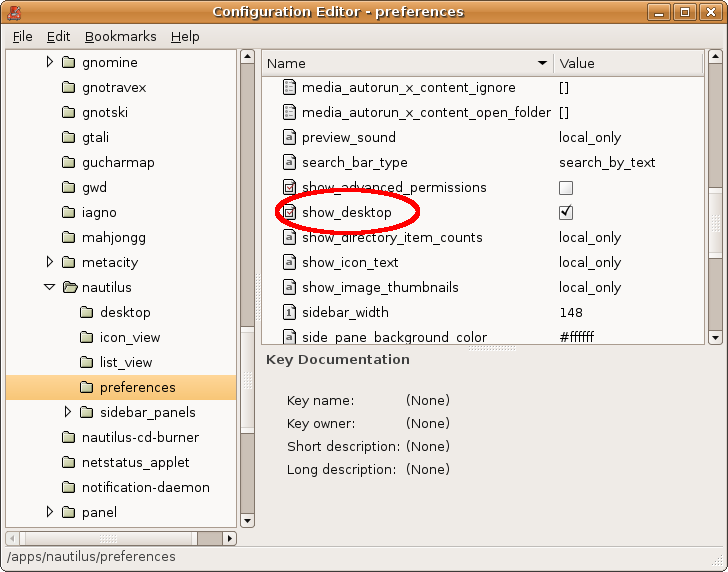
• In Ubuntu press ALT-F2, type “gconf-editor” into the dialogue then press the RETURN key

• This should have launched Gnome’s registry-alike system
– Drill down to Apps=>Nautilus=>Preferences in the panel on the left
– Uncheck “show_desktop” in the panel on the right
– Close the window
• You should now find that your Linux desktop background has vanished. This is the result of using the “-rootless” parameter when launching Xming, and telling Nautilus not to draw the desktop via the gconf-editor setting in Linux. If you want the desktop back again, just re-check the option in gconf-editor.
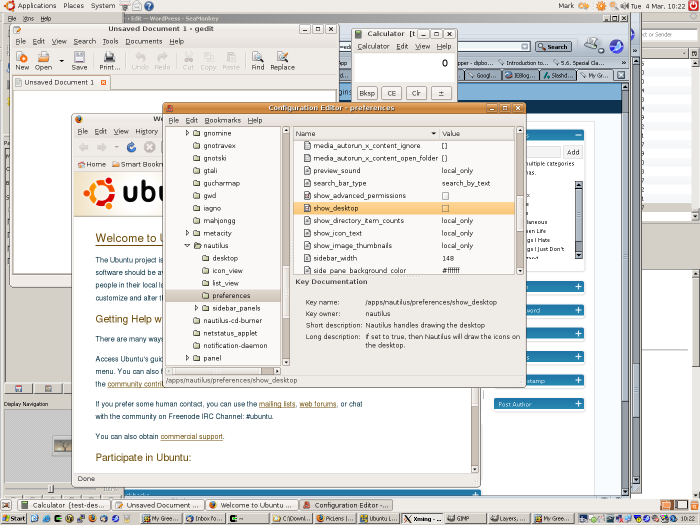
In the screenshot above you can see the effect of disabling the Linux desktop – the Xming layer becomes transparent and your other Windows applications show through beneath your Linux windows. This means that you can easily bring a Windows application to the top of the window stack just by clicking on it. It also makes it easier to arrange your windows so that you can refer to the content of a Windows window whilst working in a Linux application.
The downside to this rootless approach is that you can no longer access any icons or mounted drives that appear on the Linux desktop. It’s not too bad, however, as the desktop folder is available from the “Places” menu, as are any mounted drives. For icons in particular you can always drag them to one of the Gnome panels if you want to have quick access to them.
On the subject of the Gnome panels it’s worth noting that they are highly customisable. With the default Ubuntu settings you’ll get two Gnome panels in addition to your Windows taskbar, but if this is too distracting you can remove one of the Gnome panels (or add others), move them around, or add various launchers and applications to them. A common option is to tweak it to a point where you have one Windows bar at the bottom of the screen, and one Linux bar at the top, making it easy to switch mental contexts between the two enviroments.
Step 6: Sharing a clipboard
Using the “-clipboard” parameter in XMing should allow the X-server’s clipboard (i.e. the Linux clipboard) to integrate with the Windows clipboard. Unfortunately this doesn’t work when you’re using GDM on the Linux end – i.e. the standard case for Gnome-based distros such as Ubuntu.
To fix this, edit the /etc/gdm/gdm.conf-custom file to include the following line just below the “[daemon]” line:
KillInitClients=false
(you’ll need to edit this file as an administrator – press ALT-F2 then type “gksudo gedit /etc/gdm/gdm.conf-custom” into the box, without the quotes)
You’ll need to restart GDM for the change to take effect (e.g. reboot the machine), but thereafter you should have an integrated clipboard between the two environments. It only works for copying and pasting text, but it’s still pretty handy.
In case you’re not aware, Linux systems have two clipboards. There’s a Windows-style clipboard that you can use via menu entries or the usual CTRL-C/V/X keyboard shortcuts. But there’s also a “quick clipboard” – if you highlight some text, then middle-click somewhere else, the highlighted text gets inserted. This can be very useful when you get used to it, but does pose some problems for clipboard integration between Windows and Linux, so here are the basic rules:
• If you highlight some text in Linux you can then switch to the Windows environment and paste it using the menu option or CTRL-V
• If you copy/cut some text to the clipboard in Linux, using the menu option or CTRL-C/X, you can then switch to the Windows environment and paste it using the menu option or CTRL-V
• If you copy/cut some text to the clipboard in Windows, using the menu option or CTRL-C/X, you can switch to the Linux environment and paste it by middle-clicking with the mouse
• If you copy/cut some text to the clipboard in Windows, using the menu option or CTRL-C/X, you can switch to the Linux environment and paste it using the menu option or CTRL-V
• When pasting into Linux make sure that you don’t highlight any text first – if you do, that text will become the new clipboard contents, as per the first bullet point. In other words, you can’t highlight the text that you want to replace then paste the clipboard contents in because the clipboard contents will have been changed by the action of highlighting. If you want to replace some text, delete it first then do the copy and paste.
Extra bonus tips
In the instructions above, where you edit the properties for the shortcut, there’s a “:0” string. You can run more than one X server (i.e. more than one copy of Xming) on a single machine, by giving each one a separate screen number – “:1”, “:2″… (you’ll need to open ports 6001, 6002… on your firewall if you do this)
This lets you have more than one Linux desktop co-existing on your Windows desktop, which can be useful if you need to access multiple Linux machines for some reason. If you do this, then I recommend moving the taskbars to different locations and using different window themes for clarity – that makes it easier to keep track of which windows belong to which server.
You might want to consider putting SAMBA on the Linux box to allow your Windows machine to access files from it. Alternatively you could access a share on the Windows machine via the Ubuntu “Places” options (“Network” or “Connect to Server”), or by mounting the share with the SAMBA client tools. With the Gnome UI I’ve had most luck using the “Network” browser, then dragging my shared folder to the list of shortcuts on the left. Unfortunately not all applications like working with files that are accessed this way, but it is quick and convenient if you just want to be able to copy files between the two environments. Mounting a Windows share using the SAMBA client tools is a more widely supported means of accessing your Windows files from Linux, but requires more technical expertise to set up (see this page, for example).
Ubuntu has the ability to connect to an XDMCP server built-in. If you’ve enabled remote login on your Linux server as described above, then on another Ubuntu machine on your network press F10 at the login screen and select the XDMCP option. It will automatically scan for any XDMCP servers on your network and let you choose which one to use to log in.
You can even do this from the Live CD. Boot into it, then when the desktop comes up, log out (not shutdown) to get to the login screen, then press F10 as above. This can be very useful if you need to temporarily give people access to a Linux desktop but don’t want to install Xming on their Windows machines.
When you come to shut down the server you’ll find that there’s no option to do so via the XDMCP connection. You’ll need to shut down on the Linux server (or in the virtual environment) itself – use the “Options” (F10) menu on the Ubuntu login screen. Alternatively you can remotely log into the server’s command line using “ssh” and shutdown that way, if you know what you’re doing.
Cheers and thanks for posting this very useful guide.
While I didn’t use every suggestion made here, the description of changing the windows shortcut option with the xming command-line options such as -rootless was exactly what I was looking for when I came across your page.
The -clipboard option was also something I’d not previously been aware of (what I got for not RingTFM).
Thanks again,
Troy
Excellent article – very clearly presented. This will be a handy guide for a customer of mine that has a mix of Windows desktops and ReHat Workstations and server that all need to be administrated.
Thanks!!!!
-Lexrst
When I first tried your methods on a newly installed VirtualBox (was version 2.0.2 at the moment), I got stumped at step 2, where you had to determine the address of the box. Only then I realized that my VB was set up with NAT by default, and I had to install a TAP adapter for XMing to connect to. It’s not that hard though; you just add another adapter connecting to the host interface, and create a host interface with a random name with VB’s GUI. And then I continued with your steps, after logging in, I got myself a virtual desktop akin to andLinux’s.
Too bad XMing doesn’t have the feature to automatically shrink explorer’s space to make way for the panels (I wonder what it’s called, I don’t know Windows GUI programming that much). I guess GNOME panel isn’t too suitable for this kind of mashup, compared to XFCE’s panel or KDE 3’s kicker.
Thank you very much for this guide!
@syockit – I’ve only used VirtualBox once, primarily because I found the network configuration to be confusing. With VMWare player or server I use a bridged network so that the virtual machine gets an IP address from my DHCP server and appears alongside the other machines on my network.
I’m not sure why you think XFCE’s panel or KDE’s Kicker should be any more suitable than Gnome for this task. Although my screenshots show a default Ubuntu configuration, it’s quite easy to move or remove individual Gnome panels so that they don’t interfere with the Windows taskbar at all. For example you could move all of the widgets on the bottom panel to the top panel, then remove the bottom panel entirely. That way you have a single Windows taskbar at the bottom of the screen, and a single Gnome panel at the top.
Thanks for the great & useful guide. But I just want to know that, on which computer I have to install xming and on which computer I have to install vertual box or vmware player. Is it on the same machine in dual mode (windows+ubuntu)? or, in two different machine (windows and ubuntu)? and how can I remote login to ubuntu virtual box. Please send to my E-mail as directly.
XMing goes on the Windows machine that you want to access Linux from. The (Ubuntu) Linux box itself can be a second machine on your network, or it can be a virtual machine. In the latter case the virtual machine can be on your Windows box, or on another machine entirely – it doesn’t matter so long as it’s accessible over the network (i.e. you know its IP address and can ping it). The specific arrangement of machines, whether real or virtual, can be whatever you like – you just need one Windows machine to run XMing and one Linux machine with an XDMCP server on it.
Sorry, no email reply – I want to keep any replies public as they may help someone else. If you’re that interested, you’ll check back 😉
What is the actual name of the executable for the “login window preferences” tool ? I don’t have a ‘login window’ on my system >>> administration menu. If you give me the name I can call it up manually. Please let me know asap if you can.
It’s “gdmsetup” in /usr/bin – at least on a Karmic Koala machine. Note that if you are going to try doing this with Karmic as the server, this screen no longer contains the necessary settings for starting and configuring an XDMCP server, so it’s of little use anyway. There’s a lot more information about this – as well as workarounds – in the series of articles I’ve written starting here: https://www.peppertop.com/blog/?p=690 (and make sure you read the comments, as there are one or two other useful bits of information in there).